Monday, 22 July 2013

Lime Crime - First Impressions

Official Geradium picture from Lime Crime.

Firstly, I just want to say that the top image depicting Geradium is nowhere near what it realistically looks like. In saying that, it's still a gorgeous colour and it would probably look very close to this if you had taken a photo with flash. Anyway, Lime Crime! I have always wanted to try one of their products but I just didn't know where to obtain them from, living in New Zealand. I purchased Geradium from Chiffon Boutique (NZ) for $27NZD - this includes postage. The price for a Lime Crime Opaque lipstick in USD is $15.99 which roughly converts to $20NZD. Considering international shipping charges I would highly recommend Chiffon Boutique.

I'm wearing a light layer of Geradium.

Their range of opaque (super pigmented) lipsticks smell a lot similar to the MAC range. A sweet vanilla smell. I absolutely love this lipstick, the longevity's great, the colour is bright and smooth, it's matte with a hint of sheen, everything I love in a lippy.

Only con; it stains. It is actually so challenging to take the colour off, I assume it has some sort of built in lip stain. The pro to this is that you don't have to reapply as often. One swipe is more than enough, for a brighter shade go for two MAX.

How sweet is the packaging?

Best part about Lime Crime? They're cruelty free!! A wide range of their products are also soy and gluten free. Some are even Vegan! 

I absolutely cannot wait to get my hands on more of their lipsticks. Especially their more 'out there' colours like mint, blue and black. I'm not as interested in their eyeshadows simply because I never wear bright colours, but some of my clients are more daring, so this could be a great investment. Their eyeshadows are about $34USD/$40NZD. 

xx


Sunday, 21 July 2013

Reese's Pieces Inspired By Robjnixon

My attempt at Reese's Pieces.

Just a quick post today. Reese's Pieces 'Reese's Peanut Butter Cups' are my number one favourite candies! When I saw Robjnixon post a recipe on Youtube, I HAD to recreate them. I'm not going to go through the recipe, but you can find it here on Nicko's channel, Nicko's Kitchen. 

Yum!


Sunday, 14 July 2013

Pink Cookie Monster Cupcakes Recipe (Vanilla)


I made these little cuties for my daughters best friends 5th birthday. The traditional blue cookie monsters use the same recipe however, you would use blue food colouring/icing & mini chocolate chip cookies instead.


Ingredients: (makes 12)


 photo point_zps449a2d39.png1 box of Vanilla Cupcake Mix (click here for a homemade recipe) 
 photo point_zps449a2d39.pngShredded coconut
 photo point_zps449a2d39.pngPink food colouring
 photo point_zps449a2d39.pngWhite chocolate buttons
 photo point_zps449a2d39.pngBlack or dark chocolate writing gel (icing)
 photo point_zps449a2d39.pngMini cookies (pink 100s&1000s go nicely with this version)


Steps:


Click to enlarge.

1. [Follow on pack/website directions] Bake cupcakes & let them cool off.
Filling them approximately 1/2 full will make them rise to just under or just to the top of the case, which is best for this type of cupcake as the decorating will sit more secure. Cool before the next step.


2. Frost cupcakes.
If you have opted for a cupcake kit, use included icing and add pink food colouring until you get the desired colour. Don't worry too much about the neatness of the icing as it will be covered up in the next step anyway.


3. Tint coconut & roll in coconut.
Tint the coconut (shredded) by adding a few drops of pink food colouring, mix it around with a spoon until most of the coconut is covered, then; dip and twist the frosted cupcakes.


4. Add eyes.
Use some icing or the icing gel underneath the button so it can stick nicely to the cupcake. It also helps to practice making the dots for pupils a couple of times before applying them to the buttons. The 'googlier' the better!


5. Cut mouth shape with knife & insert mini cookie.
Cut line horizontally about 3/4 through the cupcake where you want the mouth to be so you can insert a cookie. This is why only filling the cases with batter 1/2 full is important. I found with a higher rise, the cupcakes fall apart when trying to put in the cookies.This way, they'll sit firmly and won't fall apart.


Enjoy :)


Saturday, 6 July 2013

Using Coloured Concealers

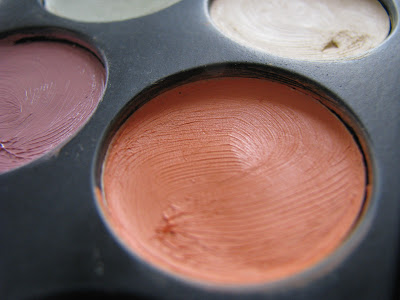
Coloured concealer palette.

Concealers don't only come in skin tones, you can get them in a variety of colours. Surprisingly, but very commonly, a lot of people use lighter shades of concealer in hopes it will cover their problem, however this will only make it more apparent, you only want to use lighter concealers to brighten and highlight. I like using cream concealers as I find they are the easiest to work with (warmed up using fingers first to make them workable), it is really up to you and what you prefer. There is always the issue with creasing (the annoying line/s you get with liquid based makeups) so you will need to always apply a thin layer of powder on to concealed areas. Concealers are used to cover blemishes, imperfections and discolouration. Here I'll show you how to choose the right coloured concealers for various skin imperfections/problems and why they work. 

First I'll help you understand WHY certain coloured concealers will help cover up these imperfections, below is an example of a colour wheel (Photo credit: Design Dish). This can be used as a guide for various purposes not only makeup. 


To neutralize and cancel out an unwanted colour, you will want to find the opposite colour using the colour wheel, as you can see purple is positioned opposite of yellow, so if, for example, you had a yellow bruise, you would use a purple based concealer to correct it. Blue works against orange, if you had a botched bleach job on your hair, you would use a blue or purple toner. Blue working against orange, and purple  working to make yellow a more 'natural' colour. Most coloured concealers have pastel or paler (tertiary & secondary) versions of primary colours, this is because most skin imperfections are usually never as bright as a primary colour, however brighter concealers are available if you feel pastels do not cover your spot well enough.


Green:


Out of all the coloured concealers, I would assume green is used the most. Green works against red, so it is perfect for use to camouflage pimples, redness, broken capillaries, rosacea and red based birthmarks.


Yellow:


Second most common, yellow. Sitting opposite purple is applied to correct most common under eye circle shades and bruises.


Lavender:


In the violet group, lavender is used to conceal yellow tinged skin/staining i.e caused from bruising or illness.


Orange:


Orange can be used for under eye circles on someone with a more olive/tanned complexion. Unwanted ash tones in medium-dark skin tones can be balanced with an orange concealer too. If bright orange doesn't compliment your skin tone, opt for a peachier shade.


Pink:


Pink shades cancel out green/blue shades like veins. A pale pink can work well as an illuminator/brightener and highlight. A more warm salmon-pink shade can also work to conceal under eye circles however you should be careful as it can accentuate them, to avoid this, be sure to only use if you have grey/blue tinged under eye circles. When using salmon-pink for under eye circles be sure to blend this extra well and follow with a concealer that matches your natural skin tone, foundation (optional) and as always, powder to set.


Additional;

Blue concealers are used to conceal dark/brown/tan spots/scarring and freckles. I mix my lavender concealer with a hint of the pale green shade and it works fine too :)


You can buy handy little colour correction concealer trios or/ multi palettes from various cosmetic stores. If you're wanting a cheaper option you can find decent palettes from eBay and Coastal Scents. Remember that not all skin blemishes/imperfections are the same as the next persons. So play around with it, mix colours together and use the colour wheel as your guide. Good luck! :)


Important Note:

You should always apply a concealer that matches your skin tone after applying a coloured concealer. For the most natural look, blend well and apply foundation over concealers. Always remember to set it with a translucent powder or powder that matches your skin tone.


Top