Tuesday, 6 August 2013

Quick Three Cheese Pastry Rolls


Ingredients:
 photo point_zps449a2d39.png Puff pastry sheets, 1 pastry makes 2 sausage roll sized rolls.
 photo point_zps449a2d39.png Pizza cheese (grated) or - edam.
 photo point_zps449a2d39.png Brie
 photo point_zps449a2d39.png Creamy feta
 photo point_zps449a2d39.png Butter or eggwash (beaten egg)
 photo point_zps449a2d39.png Baking paper


Steps:


Layer each cheese in the middle of the pastry sheet. I added some parsley but this is optional. You don't want to overcrowd the sheet as you still need to roll it up and have it all secure.


When securing, I find pinching the ends works better + is longer, rather than folding under. (right)

Then, roll them up. The easiest way is to simply fold the top and bottom end over each other and just press down on the ends to secure them. Any pastry is easiest handled when it's almost thawed. Cut some slits at the top (not too deep because the melted cheese will spill out) and lightly brush egg wash or butter on top. Doing this will give it a nice brown colour. Place on a greased tray or lightly greased baking paper and bake at 180°C or 350°F for 15-20 minutes.


That's all! Easy huh? And it tastes absolutely scrumptious! As always, Enjoy!


Monday, 5 August 2013

Dark Outer Corner Eyeshadow - Highly Requested By Clients

Eek! This is my first 'pictorial'.
I wasn't too sure how this would turn out, I don't personally wear eyeshadow (I don't feel that it suits me) but I gave it a go because a LOT of people ask me how to get the gradient-esque dark outer corner. This look is very similar to the look I applied on Delaney at Directive Photography's photoshoot a while back So, here it is!


First Shade
You want to use a light, creamy champagne (shimmer is optional) shade to 3/4 of your lid. Leaving the outer corner shade-free is a good idea to avoid the next matte colour mixing with the shimmer.


Second Shade
With a white matte eyeshadow, apply this to your inner corners and also over 2/3 of your lid on top of the first shadow, this will make the eyes pop and also brighten the colour that you previously applied.


Third Shade
For a clean cut, use some tape on the corner of your eye. I like to connect my tape by lining up the end of my eyebrow to the end of my eye. Take a medium brown shade and lightly (tap of excess) apply the shadow like a backwards 'C' or a sideways 'V'. I'm using an angled crease brush.


Almost done!
To add more dimension take a black or dark brown eyeshadow with a small-medium crease (I'm using a small square crease brush) or blending brush and simply press it onto the very corner of your eyes before the crease and with a circular motion, blend it. Less product is more, you can always build up the colour.


I hope this tutorial was helpful. For a less harsh look, you can opt out of using the tape, and after the above steps, use a clean blending/fluff brush to blend everything out. You can even play around with all sorts of different colours, get creative! :)


Saturday, 3 August 2013

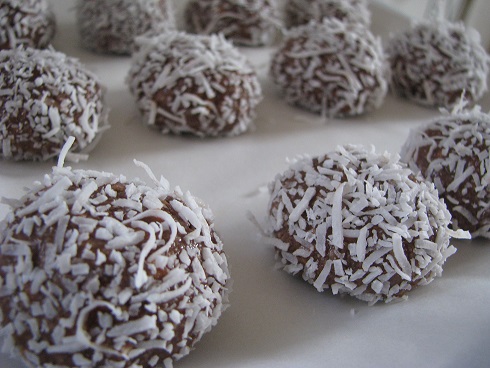
Coconut Rum Ball Recipe


Today I made coconut rum balls and thought I'd blogument the process, it was super easy, pretty cheap and absolutely delicious! 'Real' rum can be used however I just used rum essence. 


Ingredients: (makes 12 large, 24 medium)


 photo point_zps449a2d39.png 1 Cup coconut (dessicated) + 1/2 extra Cup for rolling
 photo point_zps449a2d39.png 1/4 Cup cocoa
 photo point_zps449a2d39.png 250g Biscuit of your choice, I used 'Super Wine' Biscuits
 photo point_zps449a2d39.png 1-3Tbsp Rum/rum essence 
 photo point_zps449a2d39.png 395g Condensed milk


Steps: (1-4)


1. Crush biscuits.
You can use a food processor but I like to just crush them with a wooden spoon or potato masher. It takes a little patience and it does not have to be perfectly crushed, it's all about your personal preference. The bigger 'chunks' will slightly soften when the condensed milk is stirred through and when they are setting.

2,3,4. Add coconut, cocoa and condensed milk.
The condensed milk is very sweet, so don't worry about adding any sugar.


Steps: (5-8)


5. Add rum.
It's really up to you and how strong you want them to taste, I recommend 1tbsp for a soft flavour and up to 3 for a stronger, more distinct taste. Real rum is optional, I like to use essence as I feel it has the same, but slightly sweeter flavour. You can also use vanilla essence for child friendliness.

6. Combine.
Mix all ingredients together until they are combined well. You should now have a sticky, clumpy consistency and texture.

7. Roll them up.
This is quite easy as they hold quite well when they are being formed, your hands will get quite sticky after mixing a few so it's a good idea to wash your hands and pat them until they're almost dry, this also makes rolling them easier. 1tbsp of mixture will get a nice medium-large size, 1tsp for a smaller size. Place them on some baking paper before the next step. They get quite sticky. Note; if you feel like they are losing shape when placed on the baking paper, put the mixture in the fridge for 15 minutes.

8. Cover in coconut.
The rum balls will lose their shape a little bit but you can re-form them before you cover them in coconut. They're sticky, but when you cover them in coconut and let them set they won't be.


Set in the fridge for 1-2 hours and enjoy! :)


Top